UPDATE: This kitchen has been pinned a lot. I have since reshot pics of the play kitchen with better lighting and a better camera. The pictures towards the bottom of the post are the original but if you want to pin this, I suggest using the newer pics which are now first.

Thanks to Pinterest and the lady who listed her entertainment center for free on Craigslist, my husband and I were able to make our kids a play kitchen for Christmas. This was even on the list of my almost 11 year old daughter for Christmas, she said they missed our old kitchen we made last year together with what we had laying around our home.
Although our last kitchen was fun and easy to make, the kids were hoping for something a little bigger this time. There is some great inspiration and creativity out there in blogland which helped my hubby visualize what I was hoping to do. Check out some of these great kitchens and please, please, please head over to the original blogger if you are going to pin these next three kitchen pics, they would like the credit just as I would want credit for my work! Under the photo you will find the link directly to the blog post for pinning.
Source:
Source:


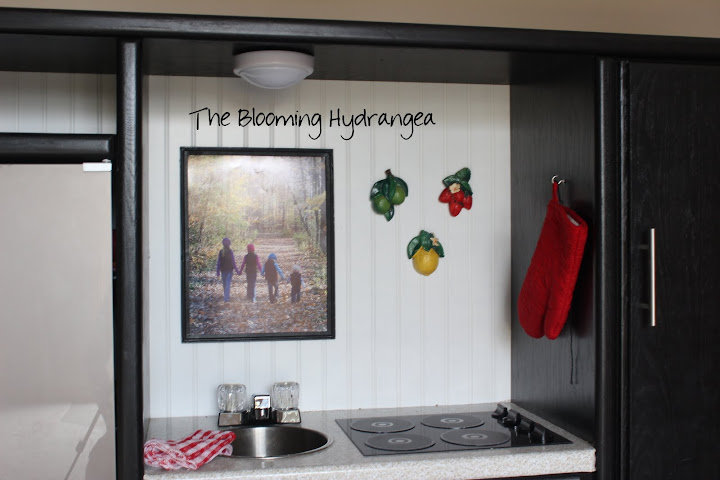
The countertop was made using Contact Paper from Target for $5 a roll with plenty left over for other projects or maybe more play kitchens. I had so much fun making this one that I would love to do some more. If you live near me and want to place an order, let me know!
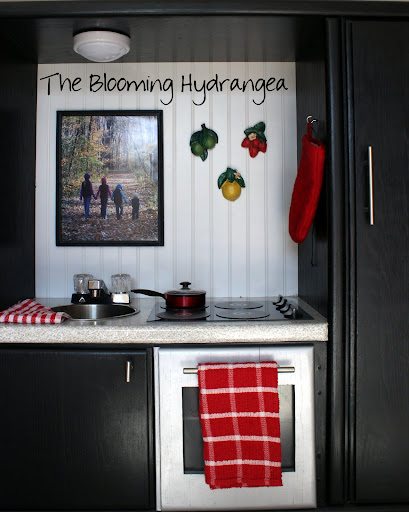
For the sink we used a stainless steel bowl we found at Savers for $3 and we purchased the faucet from Wal-Mart for $11. Hubby cut out a hole and then just placed the bowl in there and used some liquid nails around the edge to keep it secure. For the faucet he drilled the holes and screwed it in.


For the oven door, my hubby used his jig saw and cut the square shape out and attached a piece of clear plexiglass ($2) to the inside of the oven door with screws. The plexiglass did end up breaking a bit near the top so he was very careful putting in the last screw the second time around.

For the wire shelf in the oven, we purchased a piece of shelving from Home Depot for $5 and used a hack saw to cut off the appropriate width. He cut it a little too tight but that worked in our favor and then he used two screws on each side to hold the front of the rack in place. It was already gray so we didn’t need to spray paint it.

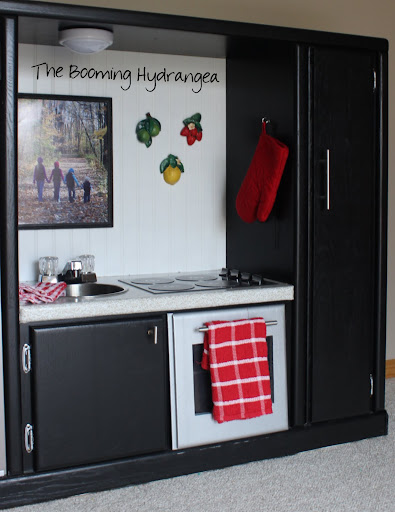

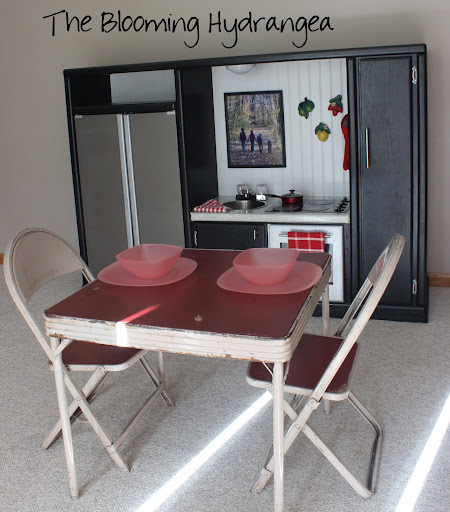
Rough estimate for the total cost of this project is $100 including the picture frame, the hand towel, oven mitt and washcloths all which came from the dollar store. If you have any questions about this, I’d love to answer them! I hope this will inspire you to turn a piece of furniture into something fun for you children or grandchildren.
I’m linking up here:
Ange, this is awesome! I have two nieces and I would love to make something like this for them!I love your creativity and that the kitchen looks modern! Nice job!
it looks adorable, ange! i am sure those kiddos were thrilled! how fun! love the photo in it, too- great idea!
Ange!! That is beyond incredible! How totally darling and so creative. I love the size and how much more realistic it looks. Your kiddos must be having so much fun with it and you should definitely be proud of your hard work. It paid off big time!
Vanessa
Okay…that is really amazing. That is the coolest kitchen ever. Your kids must be thrilled. Lucky them. Thanks for sharing at DIYbyDesign.
Found you on facebook! What a great idea for a kitchen. I didn't even know it was an entertainment center! Five stars to you for a great idea.
How fun is this!! Lucky children…remind them of that!
Love this idea! Super cute! I'm having a linky party on my blog and would love for you to link up! Here is the address
Wow – You are putting me to shame with all these great projects. Love the cloffice stencil! Glad to have found you – following now and linking up.
Kelly
Oh my goodness, I LOVE your version!! I want to make one for my daughter. Every single detail is SO cute and creative. Love, love, love!!
I found your blog through It's Overflowing! I love it! I'm your newest follower and would love for you to come follow me back if you get a chance! <3
Wow! That looks amazing! I wanted to do this…maybe when my toddler grows out of her current play kitchen.
I'd love for you to link up and share:
Oh my gosh!!!! It is the cutest thing I have ever seen!!! I bet your kids are having a ball with that! That is definitely $100 well spent…and there is really nothing better than a gift you put your own love and sweat in to (c: My kids would go crazy for that! Best part is that if I started now, I might actually finish by next Christmas! (c: You are the DIY queen, girl!
So cute I can hardly stand it!!! Thanks for linking up at ! I'm glad we're bloggy friends!!
This is so stinkin' adorable I can hardly stand it!! I came by to say thanks for stopping by my blog and then I was totally hanging on every word from this post! I absolutely LOVE it!! I wish I had seen this several years ago when my kiddos were younger. It's the details that make it…the light (love the velcro idea), the framed photo, the fridge doors…I could go on and on! VERY well done!!
Oh your play kitchen is brilliant!
What an amazing project!
I just found your blog this evening and what a treat.
I enjoyed visiting, and I am a new follower.
Have a Happy New Year!
Laura
White Spray Paint
This is way adorable! Happy New year to you. I hope you can come up with something fun for the magazine copy cat challenge, you will be glad you did!
I love transformations…this turned out amazing! It is so cute! I'm your newest follower from the chic on a shoestring party. If you get a chance, I'd love you to stop by my blog & maybe follow along too!
Sally
loveofhomes.blogspot.com
Oh my gosh Ange! That is seriously awesome!!!! I can't get over how creative you and your husband are! The fridge doors, the cooktop, the beadboard backsplash – it's all amazing!!! Wow!
OMG! We must be kindred spirits – as I was reading this, I caught a glimpse of your plates over on the sidebar…we have the same dishes!
And AWESOME kitchen! If I had room for one in my house, I would definitely be making one!
Have really been wanting to DIY a kitchen for our little guy. Love your CD idea for the burners…SO smart!!
Oh my goodness this is insane. I LOVE this! What a fun kitchen set and I can't believe how you did it!
I am having a Feature Friday linky party and would LOVE for you to link up
Thank you for sharing this, I love playing with my kids especially during the weekends.
Great job! I want to play house right along with the kiddos. And hey, there is a use for all the ugly wire shelving we are getting rid of.
Such genius! I can’t believe all the things you thought of – cd’s, acrylic, etc. Looks awesome! If I lived near you, I’d order one as a Christmas gift.
Okay, why have I never seen this? This is absolutely adorable. I love that fridge!!!!!!
I love you kitchen! I want to make one for my daughter and have been scouring Craigslist for an entertainment center…, question- what are the fridge doors made of? Originally I think they were glass.
Did you cut the whole for the sink before or after you applied the contact paper? Just wondering. I’m working on one for my kiddo and just finished sanding. I’m so grateful for your tutorial !
Pretty! This has been an extremely wonderful article.
Many thanks for providing this information.